

Play SteamVR Games Wirelessly On Your Quest 2!

A lot of us have gaming PCs, but shelling out an additional $1000+ for a PCVR headset might be a bit out of budget for a lot of us, hence why we went with the more affordable Quest 2 instead!
Just because you went with a Quest 2 however, doesn't mean you have to skip out on some of the amazing VR titles that are exclusive to Steam (such as Half Life: Alyx, Phasmophobia and Boneworks)
This guide is going to show you how to play SteamVR games, but on your Quest 2!
First like I mentioned earlier, despite not having a PCVR headset, your computer will still need to be able to handle the load of VR games. You can find out if your computer VR Ready using Steam's free VR Performance Test program. I would also learn towards "above minimum" specs because you will essentially be streaming the game to your Quest, similar to how GeforceNOW and Google Stadia works.
One of the best features of the Quest of course, is the fact that it is wireless. For the least amount of connectivity issues between your computer desktop and your Quest 2, make sure your computer is connected through Ethernet to your router (that your desktop is not using WiFi only) because you will need that higher speed and stability for this to work as flawlessly as possible.
Make sure you have at least a 5Ghz network and that your Quest is connected to it. If you are having issues with poor performance or choppiness, try playing as close to your router as possible with as little physical objects and barriers in the way.
Now that all the little nuances are out of the way, let's show you how to get it all setup, using either Oculus's built in feature called 'Airlink' (free) or the powerful software Virtual Desktop ($19.99 on the Quest store).
First - let's start with Airlink:
You're going to want to make sure you have a couple of things checked off before getting Airlink to work. On your Oculus desktop app, make sure that you are on version 28 or above and that you have the airlink option enabled. You can double check this by going to settings -> beta -> then enable air link if it is not already. Also note that the Oculus desktop app must remain on in order for your Quest to connect with it.

Put on your headset and confirm that it is also on v28 or higher (from the 'about' section), go to your system settings, then under 'experimental features' you should find airlink, toggle on to activate it.
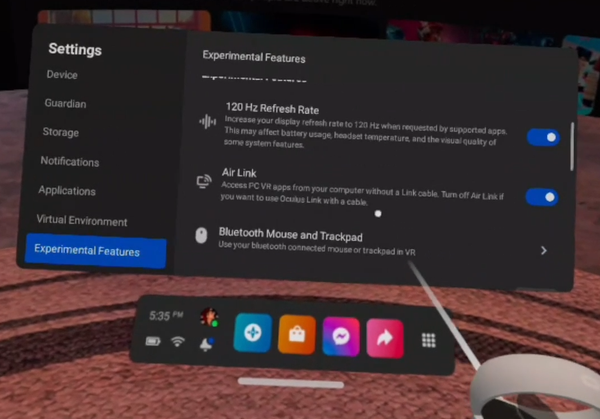
You'll get a pop up that allows you to pick from a list of devices to connect to, select your computer, then you will be sent to the Oculus desktop interface in your headset.

If you need to make adjustments to bitrate or to quit airlink and return back to your Quest home, you can use this far left button on the lower panel here.

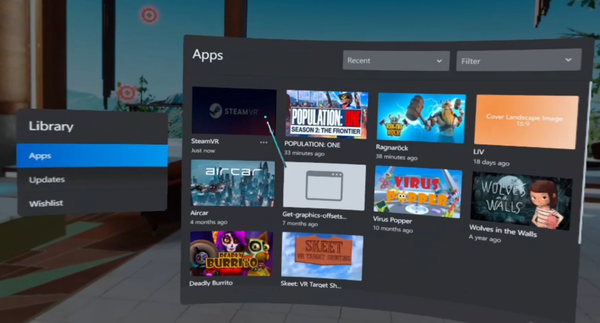
Make sure you have both SteamVR itself installed and the VR game it is that you are going to want to play. You can then launch them by going to the apps section in the dashboard. Note that if you have any other PCVR headsets plugged in, you will probably have to temporarily unplug it as SteamVR may default to that headset instead.
Now that we've shown you the Airlink way, let's show you the Virtual Desktop way!
If you'd like a comparison between virtual desktop and Airlink, check on this video that the amazing Cas and Chary did, to help you decide which may be the best method for you.
First you're going to want to purchase Virtual Desktop from the Quest store, currently going for $19.99. You're also going to need to download and install the desktop streamer app from vrdesktop.net, and connect your Oculus/Meta username to it. You're going to need to have the Streamer app on your desktop open whenever you want to use Virtual Desktop, as this will be how it 'sees' your computer from your Quest.

Open Virtual Desktop in your headset and you should see your computer pop up to connect to.

Once connected, from now on whenever you launch a Steam game that you want to play in your Quest, do it from inside Virtual Desktop by either launching Steam VR, then the game, or just launching the game itself.

And that's it, a whole new library of games awaits you!