

Increase The Quality & Performance Of Your Quest 2 Games!

The Quest is a very impressive wireless gaming device without a doubt, but one of the unfortunate downsides of being an untethered headset is that graphics quality tends to decrease in comparison to its PCVR counterparts.

(Image courtesy UploadVR)
However - you don't have to settle for the "default" graphics options, there are actually ways to increase headset quality and performance, two ways in fact!
The first method I'll show you is uses options baked into SideQuest. The great part about SideQuest is that its absolutely free!
I do want to note a couple of disclaimers here first before we get started. When it comes to changing the settings, there may be a couple of risks, namely lowering the battery life of your Quest due to increased resolution, GPU and CPU increases, and reducing performance of certain games if you attempt to push the settings too high. It's only an android device after all, not a PC - so try to remember that!
The good news is that if you really do mess things up, simply turning off or restarting your headset will reset everything as it was before. The bad news is that if you like the changes you've made, if you turn off or restart your headset, you will have to apply these changes all over again. This is unfortunately due to limitations with Android devices, but in each section I'll show you how to re-enable your settings.
No matter which method you end up choosing from this article, you will still need SideQuest to enable developer mode on your Oculus account. If you've used SideQuest before you should already be good to go and you can skip on to the next part of this article, but if not, read on!
Without further ado...
What is SideQuest?
SideQuest is a third party Quest application that that has free games and demos, but also app lab games and apps which don't appear on the main store. Although the Quest itself has a pretty impressive library as it is, it can be hard to get "approved" to be on the store, so many developers decide to go the third party route with SideQuest!
As you'll see shortly, SideQuest itself can also change some quality of life settings such as recording resolutions, higher refresh rates, disabling the proximity sensor and much more.
How to Setup SideQuest
Make sure developer mode is enabled on your Meta/Oculus account and that you have already created a SideQuest account.
We'll need to first get developer mode enabled on your Meta/Oculus account but don't worry, you don't actually have to be a real developer to do this.
First, go to dashboard.oculus.com and create an 'organization'. Pick a name, then accept the developer agreement. You may to verify your account using either a credit card or a phone number for 2 factor, but most accounts will already be verified and you may be able to skip this part.

If you are on Windows you will need to download some additional ADB drivers which you can find here. Although they say Oculus Go, but they also work for the Quest. Then install the drivers by extracting the zip folder, right click the android_winusb.inf file and click install.

Turn on your headset and open the Oculus app on your phone. Go to Menu>Devices>Scroll down to headset settings and select 'developer mode' and make sure that the toggle is on.

Reboot your headset and connect it to your PC via a USB-C or link cable. You should see a pop up in headset to allow USB debugging, select 'always allow from this computer' then 'ok'. If you don't see this pop up you may have to disable your unlock pattern in the Oculus app by going to Settings > Quest >More Settings >Unlock Pattern.
SideQuest Method (free)
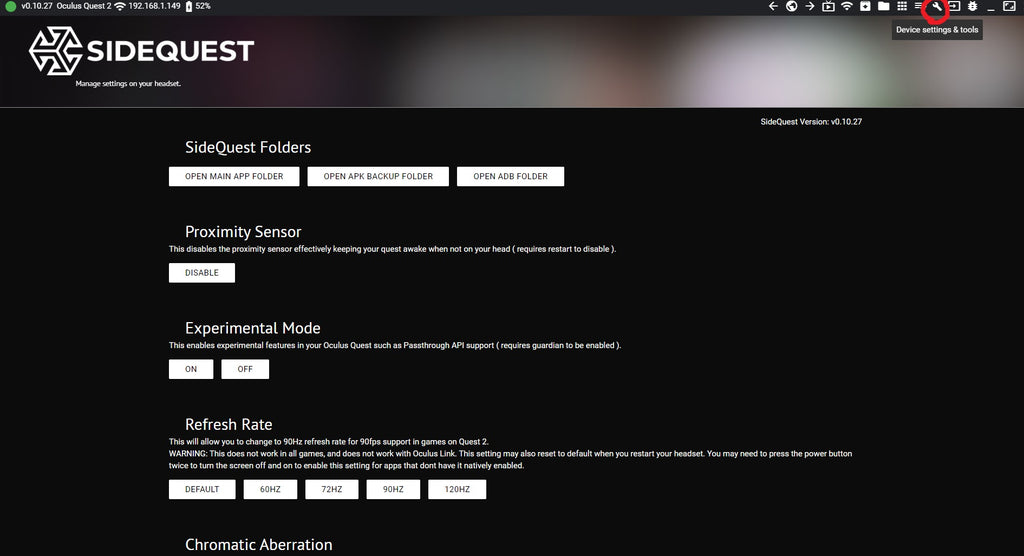
If you are using the SideQuest PC app, plug your headset into your PC, make sure it's on, and on the top left of the SideQuest menu bar make sure you see a green circle indicating your headset has been detected.

On the top right menu, click on the wrench icon, and you'll be in the right place.
If you are using the SideQuest mobile app, plug your headset into your phone, make sure it's on, and once plugged in you will have to accept some prompts that pop up on your phone, as well as in your headset. The headset prompt will ask to allow USB debugging in which you should click 'always allow from this computer', and it will look similar to the screenshot below:

You will know your Quest is connected when you see a green dot next to the SideQuest icon in the middle menu bar.

Next tap on the menu button with three dots, then tap 'tools' and you will be in the right place.

Here you'll see a ton of different options you can play around with. There are several different features you can adjust, some relating to certain games or only used for recording purposes. For the sake of the focus on this article I'll narrow down your options to those that are specifically for increasing graphics quality and performance.
Refresh Rate
Changing the refresh rate changes the frequency of how many many times per second the display of the Quest 2 is able to draw a new image. However, not all games support 90fps or higher, so your mileage will vary. Upping the refresh rate means your game play will look much smoother, at the potential cost of image quality. This may mostly benefit those playing reaction based games such as rhythm or shooter games.
Set FFR ( Fixed Foveated Rendering ) Level
FFR can increase the performance of your headset by only fully computing the pixels in the center of your headset, primarily where you look most of the time - and lowering the resolution of the pixels outside of the center. This saves on your headset's GPU (graphics processing unit).
If you are looking for high performance, choose a higher FFR, but if you are going more for image quality select FFR to low or turned off.
Default Texture Size
This will increase or decrease the resolution that your games are rendered at, causing a much sharper/clearer image with a higher resolution. The Quest defaults at 1440x1584, however most games are actually capable of going above this.
1536 as a base resolution will allow for a slightly crispier image without noticeable degradation in performance, and 2048 seemed to be the the highest point of increasing quality before you start noticing unplayable frame rates. Any higher and you may start to see performance issues (lagging/frames in headset). Of course, results may vary depending on the individual type of game you are playing.
If you do aim for a higher resolution and are noticing performance issues, you can try lowering the refresh rate to try to balance things out.
Turning Off Your Headset
Remember that unfortunately due to Android limitations, turning off or restarting your headset will reset all of your settings. If you want to play with high performance, high graphics again, you will need to reconnect your headset to your PC or mobile device, launch SideQuest and re-enable these settings again.
Quest Games Optimizer ($4.99)

The difference between the Quest Games Optimizer and the SideQuest method is that unlike SideQuest, you can control an individual game's settings vs optimizing all your headset's games as a whole. You can also make any changes to these games directly in headset, vs using your desktop or mobile device.
You have the option of tinkering with the individual game's settings yourself, or you can go with tested, ready to go recommended user created profiles.
While SideQuest is free, the Quest games Optimizer is $4.99 and was created all by one developer. You can purchase it from his itch.io page.
Prerequisites
The first prerequisites are making sure that you have Developer mode enabled for your Oculus account and that you have SideQuest. Scroll above to the "How to Setup SideQuest" section of this article to learn step by step how to do just that.
Once you download the Quest Games Optimizer from itch.io you will need to sideload the .apk via Sidequest to your Quest.
Make sure your Quest is turned on and plugged into your computer. You'll see a green circle on the top left of the SideQuest menu bar when you're good to go. Next click on the icon on the top right that looks like a keyboard key with a down arrow on it. Navigate to and select the QuestGamesOptimizer.apk, then wait a few seconds for it to upload.

In Headset
After the app has been sideloaded, head into your headset and go your library, then unknown sources from the top right dropdown, and open the Quest Games Optimizer from there.

Accept the USB debugging RSA key and remember to select 'always authorize'. You will probably get an accessibility prompt that you will need to accept as well.
You should now see a dashboard that I'll walk you through now:

Under each installed app on your Quest you can change different performance options, choose from some presets or make your own profiles. If you see HD or Ultra HD, those are pre-made community profiles. To make your own simply click on the game and adjust whatever settings you'd like.
If you're confused about how certain things like GPU and CPU effect what, you can click the little green circle on the top right for a short, in app guide on what your changes mean.

You can use the button next to the profile settings to launch the game with your new settings (red circle), however if you've chosen the accessibility toggle 'on' (blue circle) you can launch your game from the regular Quest library and your game will run with the settings you've chosen. Otherwise if you have the toggle set to 'off', you will have to launch the game through the Quest Games Optimizer.

You'll also know if you have ADB wireless enabled or by moving the toggle. If you don't even have the option to move the toggle to 'on' then the app is not going to work.
Like I mentioned at the beginning of this article, due to the nature of Android devices, any changes you make (whether through SideQuest or Quest Games Optimizer) will be reset when you turn off or restart your headset.
There's a few different methods to re-enable this and you can pick which one is easiest and fastest for you.
If you own SideQuest on either your PC or the mobile app you can enable ADB by connecting your headset to either of them and following these steps:

You can also use ADB installer included in the zip file with the Quest Games Optimizer, just make sure your headset is connected to your PC.
With the right tweaks, you can actually get a lot more performance and graphics quality out of your Quest. Use whichever method you find is the most easiest and comfortable for you, but most importantly, enjoy your new super powered Quest!