
How to Record Gameplay on the Meta Quest 3
by Atom Bomb Body
The Meta Quest 3 offers a variety of ways to capture and share your gaming experiences. In this post, we'll dive into the details of recording gameplay using the in-headset option or improving recording quality with the Meta Quest Developer Hub on PC, and transferring your captured footage from your headset to other devices.
Recording Using the In-Headset Option
The Meta Quest 3 offers two ways to record gameplay directly on the headset:
Method 1: Recording from the Menu Bar
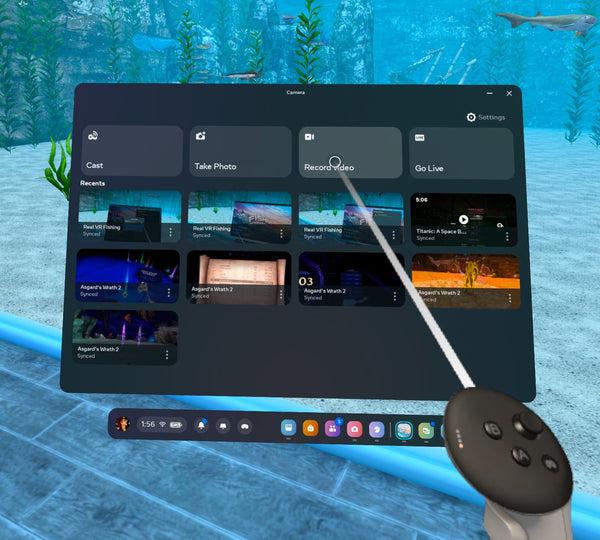
- In your headset, click on the pink "Share" button with an icon of a camera on it in the menu bar.
- Select "Record Video" to start recording your gameplay.
- If you plan to talk during the recording, make sure to enable the microphone toggle.
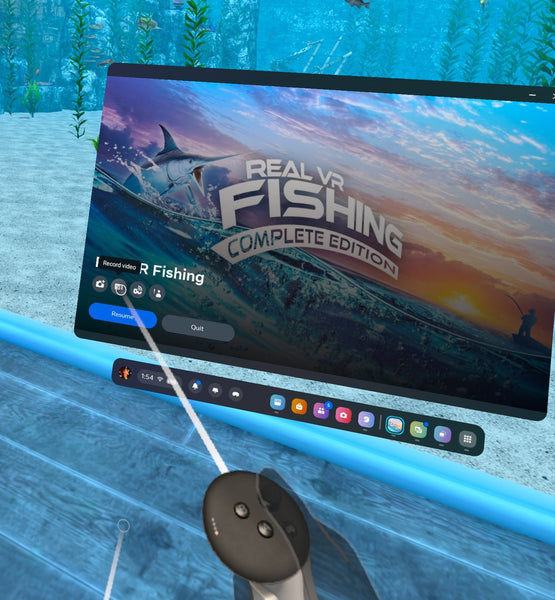
Method 2: Recording While in a Game
- While playing a game, bring up the Oculus menu by pressing the Meta button on your right controller.
- Click the round film camera button 'record video' to start recording your gameplay.
- Don't forget to enable the microphone toggle if you want to include your voice in the recording.
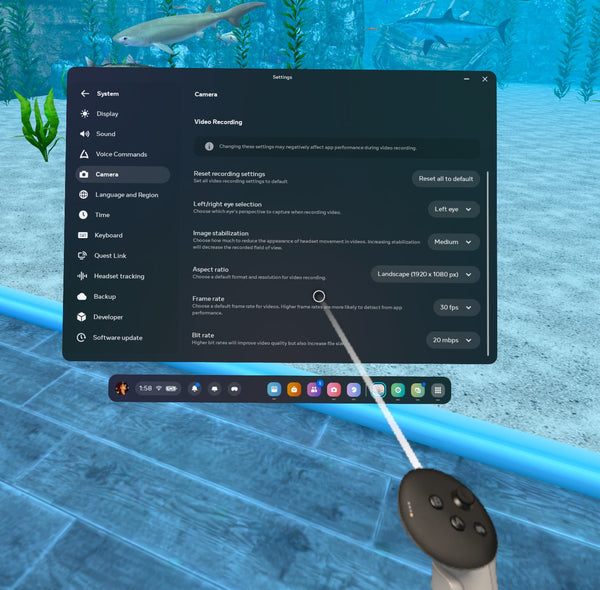
Customizing Camera Settings
Before recording, you can customize various camera settings to optimize your footage:
Go to Quick Settings (click on the time in the menu bar) > Settings > System > Camera. From there, you can choose your primary eye (left or right), amount of image stabilization, aspect ratio (square, landscape, or portrait), frame rate, and bitrate (5mbps to 20mbps).
Mixed Reality Recording
Mixed reality combines elements of both virtual reality and the real world, creating experiences where digital objects interact with the physical environment. In mixed reality games, you can see your real surroundings while also interacting with virtual elements, blurring the line between the real and virtual worlds.
To record mixed reality footage on your Meta Quest 3, follow the same steps as in-headset recording. However, here are some additional tips to enhance your mixed reality experience and make the recording process smoother:
- Ensure your playspace is well-lit and free of clutter to improve the quality of the passthrough camera and make it easier for the headset to track your surroundings.
- When setting up your guardian, make it slightly larger than your room's walls to avoid the guardian appearing in your mixed reality footage.
- If you have developer mode enabled on your account (see below for how to set that up) you can remove the guardian boundary completely for a better play experience, HOWEVER doing so will make the passthrough (your room portions) appear black on your recording.

Improving Quality using the Meta Quest Developer Hub on PC
While in-headset recording is convenient and easy to use, the Meta Quest Developer Hub software on PC offers more advanced recording options and the ability to capture higher quality footage. By using the Meta Quest Developer Hub, you can:
- Record at higher resolutions, such as 1080p or 4K, for sharper and more detailed videos.
- Set higher bitrates to improve video quality, although this will result in larger file sizes.
- Customize other recording parameters, such as frame rate and audio settings, to suit your needs.
- Use Beta Cast 2.0, an improved recording solution that provides better performance and reliability compared to in-headset recording.
To start using the Meta Quest Developer Hub for recording:
- Set up developer mode on your account:
- Go to developer.oculus.com and create an 'organization'. Choose a name for your organization and accept the developer agreement.

- If required, verify your account using either a credit card or a phone number for 2-factor authentication. Most accounts will already be verified, and you may be able to skip this step.
- If you are using Windows, download and install the additional ADB drivers from here (although they say Oculus Go, these drivers also work for the Quest).
- Extract the zip folder, right-click the android_winusb.inf file, and click "Install".

- Turn on your headset and open the Meta Quest app on your phone.
- Go to Menu > Devices > Click on your headset > Headset Settings.
- Select "Developer Mode" and ensure the toggle is turned on.
- Reboot your headset and connect it to your PC via a USB-C or Link cable.
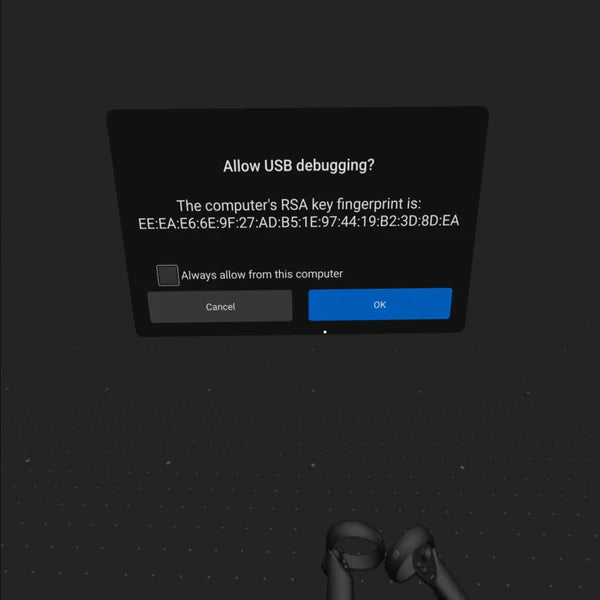
- You should see a pop-up in the headset asking to allow USB debugging. Select "Always allow from this computer" and then "OK".
- If you don't see this pop-up, you may need to disable your unlock pattern in the Quest mobile app by going to Settings > Quest > More Settings > Unlock Pattern.
- Go to developer.oculus.com and create an 'organization'. Choose a name for your organization and accept the developer agreement.
- Install the Meta Quest Developer Hub on your PC. You can download it here.
- Launch the Meta Quest Developer Hub and navigate to 'Device Manager'.
- With your Quest on, connect it via USB to your PC. A prompt/pop up will appear in headset asking for permission to connect to your computer that you need to click on.
- You'll then see your Quest 3 appear under' devices' along with more options below.
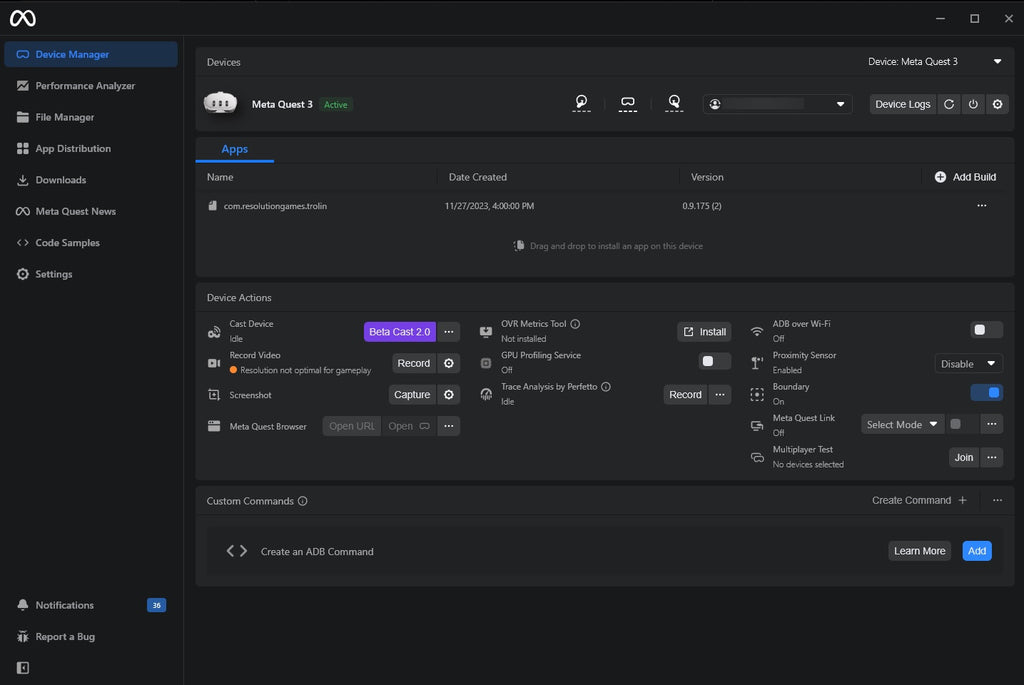
- Click on the settings cog button next to 'Record Video'. Choose the resolution (e.g., 1080p, 4K) that best suits your needs. Set the bitrate to balance video quality and file size. Higher bitrates result in better quality but larger files. Customize other parameters, such as frame rate and audio settings, to optimize your recording. When you have settings you like, you can click the 'record' button when ready to record.
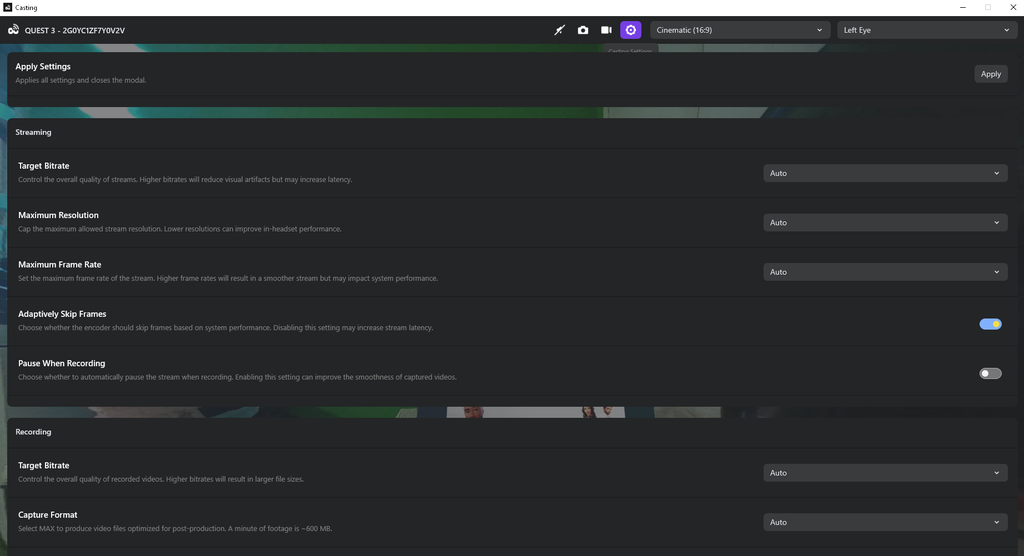
- Another way of recording in the Meta Quest developer hub is to use 'Beta Cast 2.0' (the purple button). A window showing your headset view will pop up, along with options to mute audio, start recording, take a screenshot, change aspect ratio, primary eye switching, and the same settings as mentioned above. Click the "Start Recording" button to begin capturing your gameplay.
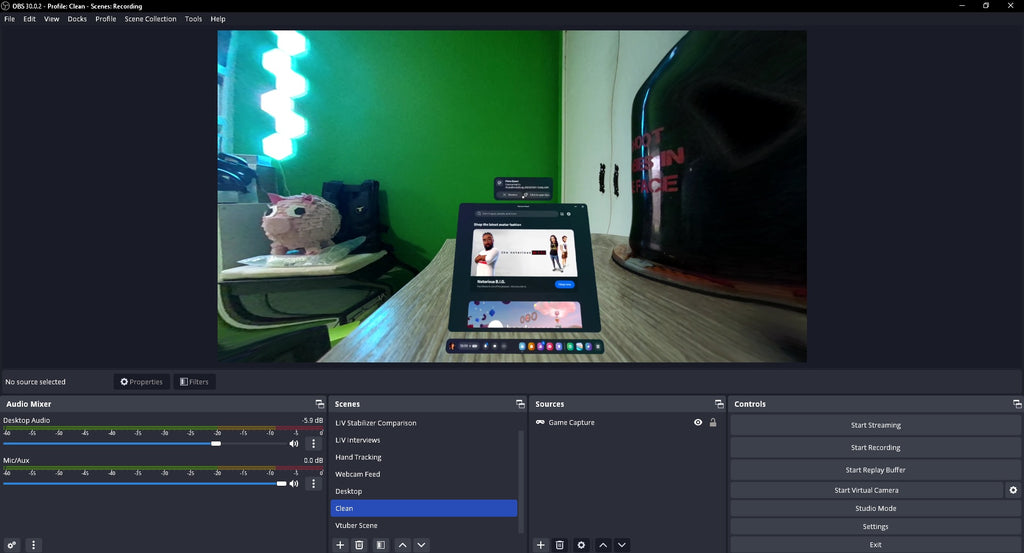
- Alternatively, if you prefer to use a broadcasting/recording software like OBS Studio, simply add game capture source and direct it to capture.exe.
You can also record/cast wirelessly, but you will need to connect your headset to your PC via cable initially to make the connection. After your Quest 3 is recognized you can toggle the 'ADB over Wifi' toggle on. Just make sure you headset and PC are on the same network. Now you may disconnect the wire from your headset.
By leveraging the MetaQuest Developer Hub, you can take advantage of more advanced recording options and settings, allowing you to capture higher quality footage compared to in-headset recording. This is particularly useful if you plan to edit your videos or require the best possible quality for your content.
Transferring Footage from Your Headset
Your next step will be to actually acquire the footage you recorded. There are two different ways to do this, by connecting your Quest to your PC, or by downloading the files onto your phone.
To get your recorded footage off your Meta Quest 3 via PC:
- Connect your headset to your PC using a USB cable.
- Put on your headset and accept the connection prompt.
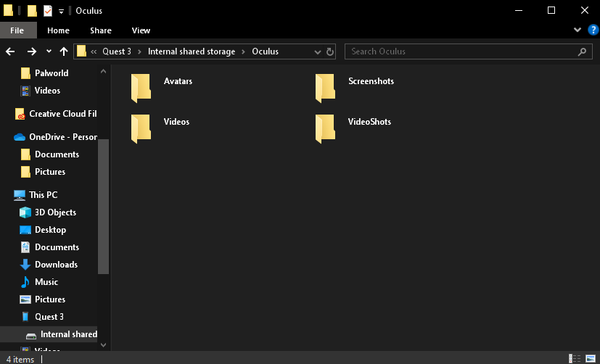
- On your PC, open the Oculus Quest folder.
- Navigate to the "VideoShots" folder for in headset recordings, or the "Videos" folder for recordings taken from the Meta Quest Developer hub.
- Copy the video files to your desired location on your PC.
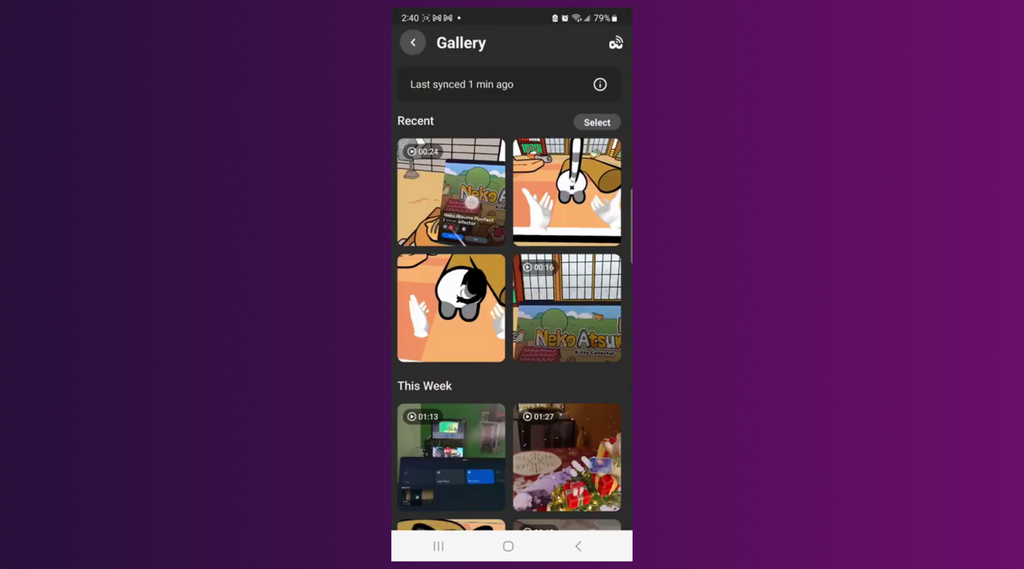
Alternatively, you can use the Meta Quest mobile app to wirelessly transfer files:
- In your headset, ensure your videos are synced to the app. You can double check this by clicking the three dots on that particular media, and clicking 'sync' if it is not.

- Open the Meta Quest mobile app, click menu button on the bottom right (the three lines), then go to the Gallery.
- Long-press a video to download it or tap to view and download.
Conclusion
The Meta Quest 3 provides a range of options for recording and sharing your gameplay. Whether you prefer the simplicity of in-headset recording or the advanced settings of the Meta Quest Developer Hub, you can capture high-quality footage of your virtual reality experiences. Keep this guide handy and you'll be able to record, customize, and transfer your Meta Quest 3 gameplay like a pro!

This describes how to capture flat 2D Videos but I want to record the 3D VR Gameplay the way I saw it in my Quest so that I can play it back and show it to a friend on my Quest or better on some sort auf VR Youtube. How can this be accomplished?